Movies Chinchillas Degus Persian Jirds Baby Jirds Gerbils Cages Guinea Pigs Search
eRodent > Rodent Movies > Taking Photos and Video Clips

Taking Photos and Video Clips of your Pets.


This is a new page with information on getting good photos and video clips of your pets and the equipment that we use to make this site. It is my current ongoing project so please come back for more info soon.

Taking Photos.

The best thing for taking photos of small animals is a digital camera. It does not have to be a very sophisticated one but it must have the ability to turn the flash off and have a digital screen on the back so that you can see what you have taken. A high pixel depth is not required - I take all of my photos in 640x480 pixels because any more than that makes the files too large.

The digital screen at the back which shows you what you are about to take and what you have taken afterwards is a must. This allows you to take photos without having to be behind the viewfinder so that you can put the camera inside a cage and just look at the screen. It also allows you to take photographs through the bars of cages and see exactly what you are going to get.

The advantages of being able to see the photo the second you have taken it are enormous. It means that you can keep making minor adjustments until you get it right.

Always take photos in good light and turn the flash off on the camera. No animal is going to enjoy having a flash set off in its face but it is a particularly bad idea with nocturnal animals such as Jirds and Chinchillas whose eyes are not equiped for bright lights.

Fluffy all a blur 
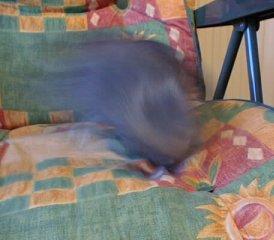
Getting a good photo of a small animal is as much luck as experience. It takes a lot of time and patience and it is a good idea to always have the camera sitting around. Still you will get far more dodgy photos than good ones. On the left is one of my favorites of fluff. She moved as the photo was being taken. Good daylight is always best for taking photos because the exposure time (the amount of time that the camera needs to hold the shutter open to get enough light in) is much shorter.
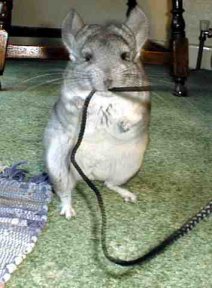
Try to get the thing that you are taking in the centre of the shot. Your camera will have a little square which it used to indicate what it is focusing on. In this photo pumpkin is in the centre of the shot and well in focus. It is worth noticing that this shot also includes all of her tail and the hay rack which add interest to the photo. Unfortunately I have been forced to have the cage bars in the background. This photo was taken by placing the lens so that it took a shot through the bars of the cage without them showing. The digital screen on the back of the camera was used to ensure that none of the bars were in shot. Pumkin and Hay
Fluffy in a tube 
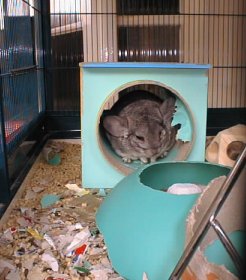
Here's a photo showing why it is always a good idea to keep your camera sitting around. Fluff was looking so cute in her tube here. Notice that there is a lot of debris around the cage cluttering the shot though. The best photos are taken against a neutral background. This is in some ways easier with tanks but the present their own problem in the form of reflection. You need to have a good light from behind you to take a photo and this can reflect off of the tank and you can often see reflections. The picture of Cookie the gerbil on the front page of this site has several books reflecting on the tank glass.


Most cameras click and wirr and make various bleeping noises which can upset timit rodents which is another reason for getting your animals used to the camera. Then there are the unexpected problems such as Fluff's obsession with the camera cord and Willow and Pumpkin's insistence upon sticking their little noses on the lens.

Fluff and the cord. Pumkin too close to the camera.
"Sure the camera can focus at one inch mum!"


Once you have downloaded the photos from your camera onto your computer you need some image editing software to crop the photo and resize it too a good size. I use Paint Shop Pro to edit my photos but you will often get a package with your digital camera. It is worth spending the time learning how to use a photo editing package as you can get some good effects.

Edit your photos so that the animal is in the centre of the photo and anything unattractive around the edge is cut out of the photo.

I use the xat.com jpeg Optimiser to reduce the size of the picture files that I put on my website. You can often get about 25% off the size of the file without reducing the quality of the picture too much. It is always a toss up between quality and size though.

Taking video footage.

Coming soon. . .

Computer equipment used.

Coming soon. . .

Back to Main Page